The ZX Spectrum+ is basically the same as the 48k ZX Spectrum with a different keyboard and case, and a reset button. The board circuitry is similar apart from the reset button and the fitment of an extra resistor.
The layout of the keyboard is different, which because of its complexity now needs a five-layer membrane. The spring action of the keys is provided by a bubble mat.
For details, see the ZX Spectrum+ upgrade instructions, which accompany the upgrade kits.
The flextails running from the keyboard to the clamps should lie in an S shape, to prevent tension in the membrane. This is achieved by ensuring that the end of the tracks on the middle layer protrude by 1mm past the clamps. This is easily seen on the wider tail, but not so clear on the narrow one. Visible markers are provided on future membranes.
When clamping the flextails, ensure that an extra packing piece is included under the tails at the clamp position. (These are fitted to current production models). These should be approximately 0.75mm thick, and as wide as the tail. Paxolin is a suitable material. This section does not apply to any Spectrum+ which has S as the first digit in the serial number.
When assembling the keyboard, it is advisable to tighten the screws in the following order:
The screws should be tightened to the minimum to give a firm fit, (eg a quarter-turn back from full tightness).
Ensure that on each membrane tail the 2 tail surfaces are stuck together, to avoid short circuits on the board. This is best achieved by using a piece of double-sided tape, or a pair of tabs around the edges, near the connector end. This is current practice in production.
Both metal and plastic reaction plates are possible. The metal plate has to be accompanied by a plastic insulator. The plastic reaction plate is similar and cheaper. The metal plate needs 6.5mm fixing screws and the plastic plate needs 8mm.
It is advisable to check the operation of all the keys on a new assembled keyboards.
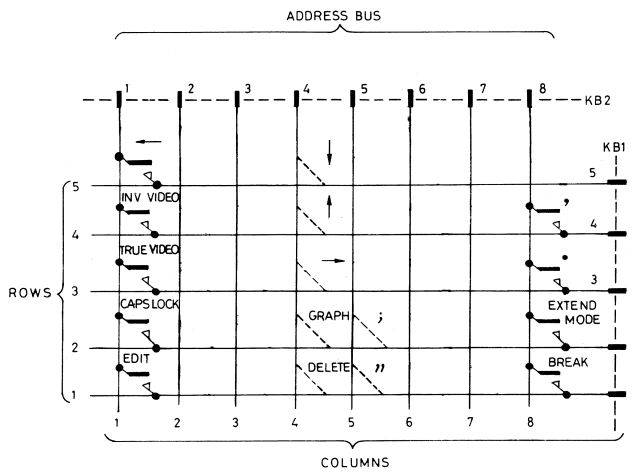
The Spectrum+ keyboard is in effect two switching membranes in parallel, a 'top' membrane and a 'lower' membrane.
The top membrane is similar to that for the Spectrum 48k, except that pressing any one of the following keys also makes contact between row 1 and column 6 on the top membrane in addition to their dedicated row/column positions:
| TRUE VIDEO | EXTEND MODE | CURSOR |
| INV VIDEO | EDIT | CURSOR |
| BREAK | CAPS LOCK | CURSOR |
| DELETE | CURSOR |
|
| GRAPH |
For example, pressing TRUE VIDEO connects row 1/column 6 on the top membrane as well as row 3/column 1 on the lower membrane.
Also pressing any one of the following keys also makes contact between row 2 and column 8 on the top membrane in addition to their dedicated row/column positions.
. (full stop)
; (semi-colon)
" (inverted commas)
, (comma)
For example, pressing the full stop key connects row 2/column 8 on the top membrane as well as row 3/column 8 on the lower membrane.
Click on the above image for a larger version (44.8k GIF file)

back to Supplement 1 |
return to Service Manual Index |