Resources
This has been a common request lately: musicians want to pull a loop off of some old vinyl, or else they want to preserve their album collection digitally.
Either way, they want to do so with as much fidelity as possib le. That leaves out those cheesy DJ mixers. Since most consoles do not feature phono inputs, I had one option: design a small RIAA preamp for studio use.
Thus the Project r Phono Preamp was born.
Emphasis
“Why can’t I just use a good mic pre?” you might ask. Well, a little history is in order.
In the golden era of recording, grooves were cut into a disc by a lathe. The grooves physically represented the waveform that was recorded.
Playback is achieved by having a needle (connected to a magnetic pickup) riding in the groove. The side-to-side variations of the groove move the needle and magnetic pickup. The electrical output from the pickup is our audio signal, just waiting to be amplified.
To get a certain amount of time on a 12" disc that is spinning at 33-1/3 RPM, the grooves could only be cut so big. If you varied the groove too much it would cut over into an adjacent groove, destroying it. This is where mastering engineers really earned their pay!
There was still one problem to overcome. As frequency increases, the amplitude of the waveform required to reproduce the same sound level drops. Therefore, low frequencies need a bigger groove than high frequencies. That also means that high frequencies would get lost in the noise floor as their groove size got smaller.
To overcome this effect, pre-emphasis, an equalization curve, was applied to the signal. This artificially increased the size of the higher frequency wiggles in the record to keep them detectable above the noise floor. To recover the audio properly, the preamp used on the magnetic pickup must “de-emphasize” the boost in the highs.
The specification for the de-emphasis is that the frequency response should start to fall off between 50 Hz and 500 Hz and then again around 2.1 kHz. The actual specificatio ns are in time constants (obtained by multiplying the appropriate resistance and capacitance) and are 3180, 318, and 75 microseconds.
De-emphasis
There are several schools of thought on how to achieve the de-emphasis correctly. I settled on the one that prefers the de-emphasis occurring in the preamp itself.
The topology used in the Project-r Phono Preamp has been around for a while and is a standard. What really sets it apart, though, is the use of a top notch op-amp.
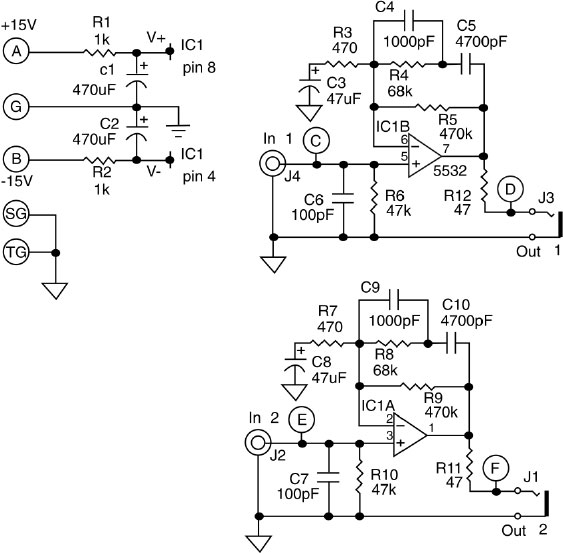
Check out the schematic and follow along; we’ll look at one channel, as they are both identical. The signal from the pick-up (cartridge) is connected across a 47K resistor in parallel with a 100pF capacitor. This forms a lowpass filter that filters out anything above 33 kHz. It also provides the correct impedance for the phono cartridge.
The gain stage is a standard non-inverting op-amp configuration with the gain nominally equal to one plus the 470K resistor divided by the 470Ω resistor. This is roughly 60 dB. At low frequencies the response falls off due to the interaction of the 470Ω resistor and the 47uF capacitor. This is our built in “rumble” filter.
Now comes the RIAA network in the feedback path of the op-amp. The 470K resistor and the 4700pF capacitor form one portion of the network, and the 68K resistor with the 1000pF form the other. Yes, there are some interactions for the purists out there, but it works, and most importantly it sounds great.
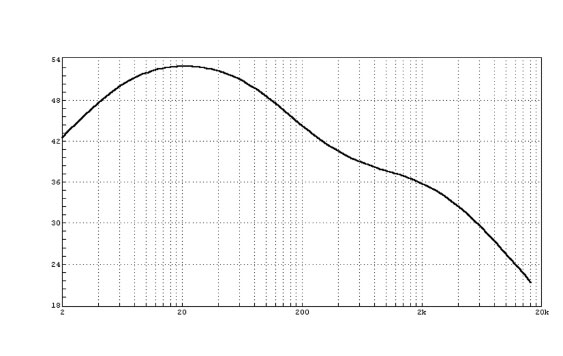
Check out the frequency response graph. The key to stellar performance is the NE5532 dual op-amp. It is the one manufacturers compare theirs to when they announce an “improved” audio op-amp. Interestingly, I have found the NE5532 in a lot of gear in the $1000-and-above range; gear in the $300 and under range generally uses less expensive op-amps.
Here is a list of all of the pin-for-pin compatible ones I have tried and can recommend: OP-275 manufactured by Analog Devices, LM833 from National Semiconductor, and the OPA2134 and OPA2604 brought to you by Burr-Brown. Good luck on hearing a major difference.
The OPA2134 is brand new and is the first “rail to rail” op-amp with audio specifications. I really like the OPA2604 because it will operate on ±24 Volt supply rails, and it sounds excel lent— but costs about $3. The NE5532 runs about 60¢. Digi-Key carries all but the Analog Devices parts. Feel free to use any of these.
If you are having trouble sleeping at night, check out the data sheets on all of these from their respective manufacturers’ Web sites. (Do a search for “Operational Amplifier” on your favorite search engine.)
Constructing hairy
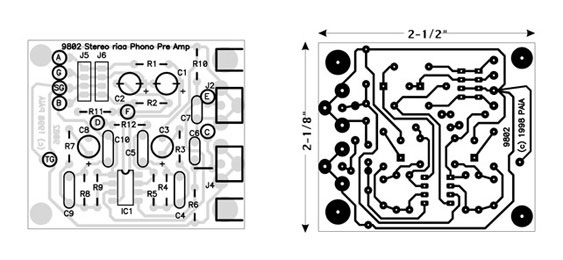
Construction is straightforward. PAiA Electronics has put together a kit with everything you need, including a PC board. It is also possible to breadboard the entire circuit on a Radio Shack perf-board (part #276-168a). That’s how my first one was built.
One thing that is shown in the schematic but needs to be explained is the ground lug. If you have ever connected a turntable to a stereo receiver, you already know about this. For all you youngsters in the CD-only generation, the ground portion of the RCA plugs on the leads from the turntable are not wired to the circuit ground of the turntable’s phono cartridge. This is done to minimize ground loops, etc. A separate ground wire is run along with the RCA plugs. This must be connected to the ground lug on the phono preamp or bad things will happen and they will happen to you!
Nominal power supply should be ±15VDC, but the Project-r Phono Preamp will run on ±9 to ±18 VDC. If you really wanted to you could run it off a couple of 9V batteries.
Build it and reap
The Project-r Phono Preamp can also be retrofitted into an existing piece of gear or a console. Yes, you can be the only one on your block with mic, line, AES/EBU, S/PDIF, and phono inputs on your mixing board.
Now you don’t have to use an audio plug-in to add record scratches—just cue up any album with the needle at the end of the record and mix in the real thing.
Jules Ryckebusch can be contacted at talkback@recordingmag.com. He has designed a number of Project r devices for Recording, all of which are sold through PAiA Electronics at www.paia.com
Project r RIAA Phono Preamp Parts List
Qty / Description / Part Number
Semiconductors
an>1 5532 Dual OpAmp IC1
Capacitors
2 1000pF Polystyrene C9, C4
2 4700pF Polystyrene C10, C5
2 100pF Ceramic Disk C6, C7
2 470uF 25V Electrolytic C1, C2
2 47uF 15V Electrolytic C8, C3
Resistors (5% 1/4W, values in ohms)
2 1k (brown-black-red) R2, R1
2 470 (yellow-violet-brown) R7,R3
2 68k (blue-grey-orange) R8,R4
2 470k (yellow-violet-yellow) R9,R5
2 47k (yellow-violet-orange) R10,R6
2 47 (yellow-violet-black) R11,R12
Miscellaneous
2 PC Mount Phono Jacks J2,J4
2 Panel Mount 1/4" Phone Jacks J1,J3
...plus circuit board or perfboard, wire, hardware, solder, etc.
The following are available from: PAiA Electronics, 3200 Teakwood Ln., Edmond, OK 73013. (405) 340-6300, info@paia.com, http://paia.com/riaa.htm
The complete kit includes all electronic parts, jacks and circuit board for $23.75 + $2.00 shipping &handling. Order #9802K.
The circuit board is available separately for $10.00 postpaid. Order #9802pc.


